Using Phantomake with Github Pages
Github Pages offers free hosting of static websites generated from public Github repositories. Using Github Actions, we can build and deploy a webpage using Phantomake easily.
This guide assumes you are familiar with using the terminal and Git and Github to create and push Git repositories.
1. Create a new repository
First, create a new Github repository. Note that the repository name determines the URL of your site:
- If it is named
username.github.io(with your Github username substituted in forusername), your webpage URL will be https://username.github.io. - Otherwise, your webpage URL will be https://username.github.io/repositoryname
After creating the repository, you will want to create a local git repo connected to it.
2. Enable Pages
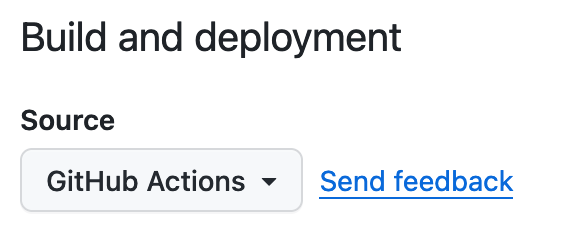
Head to the Settings page for your new repository, and click the "Pages" link in the sidebar. Under the "Build and Deployment" heading, click the "Source" dropdown and set it to "GitHub Actions".
3. Add a package.json file
In your local repository, add a package.json file:
{
  "name": "repositoryname",
  "version": "0.1.0",
  "private": "true",
  "scripts": {
    "phantomake": "phantomake src dist",
    "watch": "phantomake watch src"
  },
  "dependencies": {
    "phantomake": "https://github.com/Osmose/phantomake/releases/latest/download/source.tar.gz"
  }
}
This file stores the URL that we will fetch Phantomake from, as well as specifies some useful commands for previewing your website before you publish it.
4. Create your initial webpage
The source directory for your webpage will be located under the src directory with the repository. Create the src directory and add a placeholder HTML file:
<!DOCTYPE html>
<html lang="en">
  <head>
    <meta charset="utf-8">
    <meta name="viewport" content="width=device-width, initial-scale=1">
    <title>My Phantomake Website</title>
  </head>
  <body>
    <p>This is my new website, made with Phantomake!</p>
  </body>
</html>
5. (Optional) Test your webpage locally
If you've downloaded and installed Phantomake, you can preview your webpage with the watch command:
phantomake watch src
The HTML page above should be available at http://localhost:8000 in your web browser.
Alternatively, if you have Bun installed, you can install Phantomake as a dependency and use the helper scripts from the package.json file:
bun install
bun watch
In watch mode, Phantomake will rebuild your website if any files in the source directory change, which is very useful for quickly previewing changes to your website.
6. Configure Github Actions
The last step before deploying your webpage is to tell Github Actions how to build your webpage with Phantomake. To do this, create a file under the .github/workflows directory within your repository:
name: Build and deploy site
on:
  push:
    branches: ['main'] # Your website will be built every time you push to the `main` branch
  workflow_dispatch: # Allows you to run this workflow manually from the Actions tab
permissions:
  contents: read
  pages: write
  id-token: write
concurrency:
  group: 'pages'
  cancel-in-progress: false
jobs:
  build-deploy:
    environment:
      name: github-pages
      url: ${{ steps.deployment.outputs.page_url }}
    runs-on: ubuntu-latest
    steps:
      - name: Setup bun
        uses: oven-sh/setup-bun@v1
        with:
          bun-version: latest
      - name: Check out repository code
        uses: actions/checkout@v4
      - name: Bun install
        run: |
          bun install
      - name: Build site
        run: |
          bun phantomake
      - name: Setup Pages
        uses: actions/configure-pages@v3
      - name: Upload artifact
        uses: actions/upload-pages-artifact@v2
        with:
          path: 'dist'
      - name: Deploy to GitHub Pages
        id: deployment
        uses: actions/deploy-pages@v2
This workflow file sets up Github Actions to download and install Phantomake, generate your website with it, and then upload it to Github Pages. It will automatically do this every time you push to the main branch of your repository.
7. Publish!
Commit your changes and push them to the remote Github repository. After pushing, you should be able to click the "Actions" tab on your repository and see an action corresponding to your push. If there's an issue with building your webpage, the logs on the Actions tab can help you diagnose the issue.
Once the action completes, your webpage should be available at the URL discussed above. It may take a few seconds or minutes to update to the latest version; if you don't see your updates immediately, try refreshing the page a few times and clearing your browser caches.